For Apple device users, the iCloud Music Library is possibly one of the most valuable features. It allows you to store your entire music collection in the cloud and access it from any of your idevices as long as you are signed in with your Apple ID. Yet, there are reasons that you might want to turn it off, either temporarily or permanently. Maybe you are running low on storage space and need to free up some room on your iPhone or iPad. Or perhaps you have songs in your library that you do not want to share with other devices.
Whatever the reason, it's easy to do it. In this article, we will show you how to turn off iCloud Music Library on your Mac, iPhone, iPad, or iPod step by step. Please follow the parts below to make it.
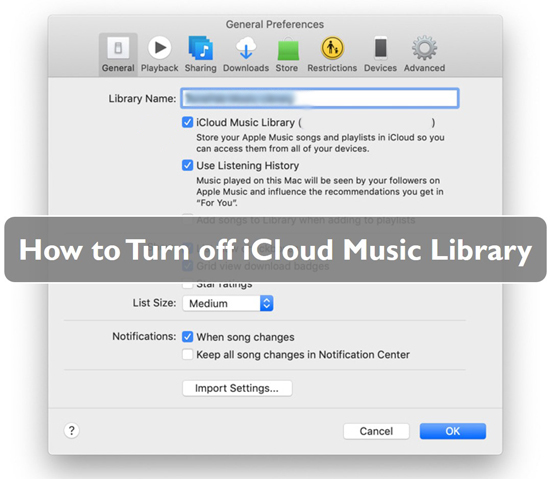
Part 1. What Is iCloud Music Library?
First launched in 2015, the iCloud Music Library is a feature that allows you to sync your entire music collection across all of your iOS devices. That way, you can access your songs, albums, and playlists from anywhere. But how it works? When you enable it on your music app, it will scan your library, match music in your iTunes Store and make it in cloud. The music will be 256 kbps in AAC format.
To use the iCloud Music Library, you need to have an Apple Music or iTunes Match subscription. Assuming you have iCloud Music Library turned on, your iTunes songs will be stored in the cloud library. And you can access the cloud and play music from any of your devices with your Apple ID signed in.
Main Features of iCloud Music Library
- The ability to access your entire music collection from any of your devices.
- The ability to download songs or albums that you've purchased from the iTunes Store on up to 10 devices.
- The ability to download up to 100,000 song collections.
- The ability to access the entire Apple Music catalog.
- The ability to keep the matched songs or songs available in the iTunes Store at 256 kbps.
- The ability to save music videos purchased from iTunes Store.
Yet, there are also some drawbacks and bugs of iCloud Music Library.
- You can't sync music from iTunes to your iPhone manually.
- It is available in limited countries or regions.
- It requires an Apple Music or iTunes Match subscription.
- There will be missing music, and wrong metadata of your tracks.
View also: How to Fix Apple Music Songs Not Available in Regions
Based on the cons of iCloud Music Library above, you may want to turn it off. But you should know why you want to do that and what will happen after you do that.
Pros of Turning off iCloud Music Library
✔ You can save storage space on your device and choose which songs to share with other devices.
✔ It is also a remedy for some iCloud errors, such as album mismatch, wrong song metadata, and sync failure.
Cons of Turning off the iCloud Music Library
❌ You will no longer have access to your entire music collection from all of your devices.
❌ Also, any song that you had stored in the cloud will be deleted from your device. This includes your Apple Music catalog, iTunes library, or other songs uploaded to iCloud.
❌ You can't sync your local music library from one device to another device automatically.
❌ You can't access Apple Music content without connecting to an internet network.
❌ You can't add songs/playlists from Apple Music to iCloud Music Library and download Apple Music content.
Hence, before you disable iCloud Music Library, it would be wise to create a backup for all your iCloud songs/tunes. To back up Apple Music and iTunes songs, you can use AudFree Audio Converter in Part 5.
📢 Note: You can still access any songs purchased from iTunes whether the iCloud Music Library is turned off or not.
Part 2. How to Turn off iCloud Music Library on Mac
If you are using a Mac computer, please follow the instructions below to complete the process.
For MacOS Catalina or Latest Versions:
Step 1: Launch the Apple Music app on your computer.
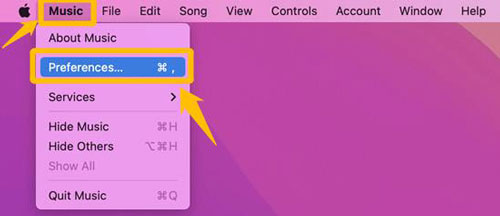
Step 2: Go to click on the "Music" option > "Preferences".
Step 3: Next, go to "General" and uncheck the "iCloud Music Library" option.
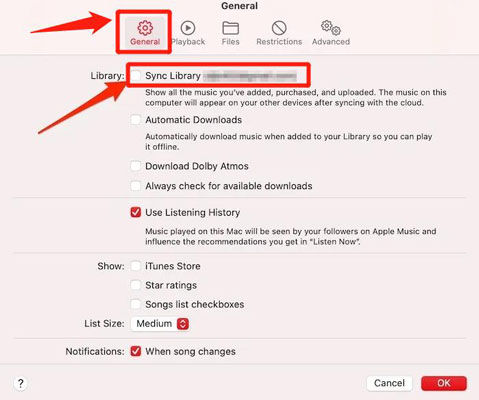
Step 4: Touch the "OK" button to complete the process.
For Older MacOS Versions:
Step 1: Start the iTunes app from your computer.
Step 2: Go to "iTunes" > "Preferences".
Step 3: Click on "General" on the window and uncheck the "iCloud Music Library" option.
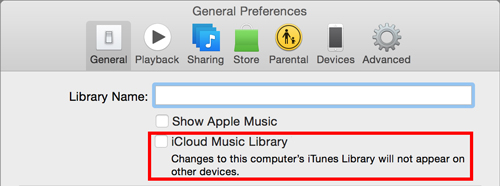
Step 4: Tap "OK" to finish.
View also: How to Fix Apple Music Not Working on Mac
Part 3. How to Turn off iCloud Music Library on iPhone/iPad/iPod
Suppose you want to deactivate iCloud Music Library on your portable iOS devices such as an iPhone, iPad, or iPod, how do you go about it? Here is a quick guide for you.
Step 1: On your iOS device (iPhone, iPad, or iPod), go to the Settings app > click the "Music" option.
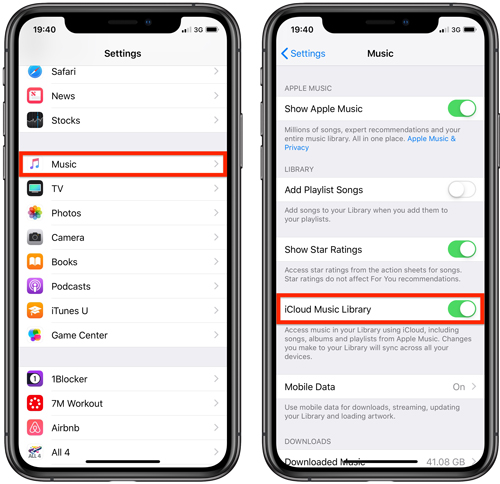
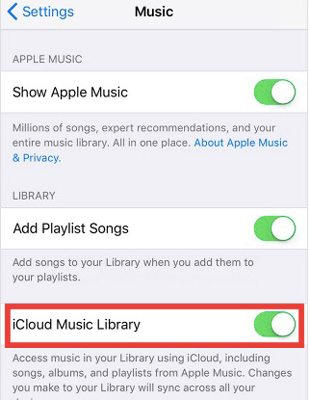
Step 2: Scroll down to find the "Sync Library" if your device is running with iOS 13, iPadOS 13 or above. Or, on the earlier version iOS devices, touch the "iCloud Music Library" option.
Step 3: Slide the toggle to turn off your iCloud on iPhone/iPad/iPod.
View also: How to Use Apple Music on iPod
Part 4. How to Disable iCloud Music Library on Windows PC
Turning off the iCloud Music Library on a Windows PC is similar to a Mac computer.
Step 1: Download, install and launch the iTunes app on your PC.
Step 2: Go to "Edit", then click on "Preference".
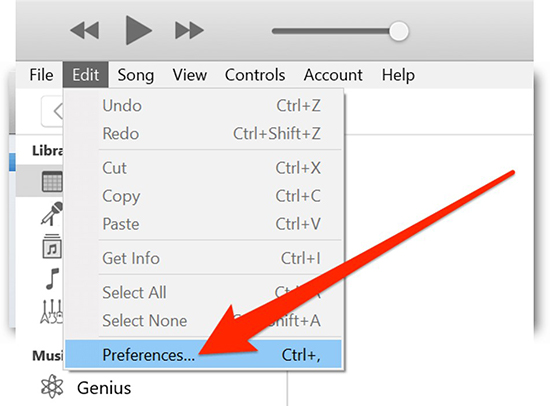
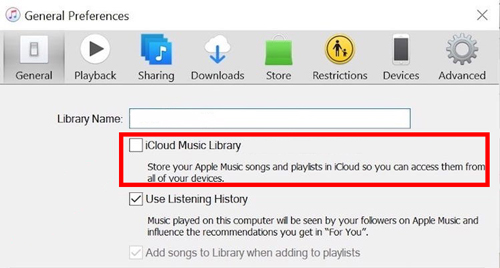
Step 3: Then uncheck the "iCloud Music Library" > click "OK" in the window.
Part 5. How to Back up Apple Music without iCloud Music Library
Even though turning off iCloud Music Library helps fix some iCloud-related issues, it is not a good idea to do so if you want to keep your music collection safe. Since turning it off will delete all the songs stored in iCloud, it is highly recommended that you create a backup of your music collection before switching off the iCloud Music Library.
However, creating a backup for protected Apple Music songs can be challenging as the songs are encrypted and can only be played on authorized devices. To back up your Apple Music collection, you will need the help of a third-party tool such as AudFree Auditior, a powerful Apple Music converter.
AudFree Auditior is an easy-to-use tool to convert protected Apple Music songs to common MP3, FLAC, AIFF, Lossless, WAV, M4B or M4A files. Once the conversion is complete, you can keep the Apple Music songs on your computer forever, even if you cancel your Apple Music subscription or disable iCloud Music Library.
Apart from converting Apple Music, the app can also help you download and convert iTunes M4P to MP3, FLAC, and AAC formats for offline playback. And it preserves the original audio quality of the songs and offers lossless conversion at 17X faster speed.
AudFree Audio Converter is available for Mac and Windows computers and can be downloaded from the official website. Once you have downloaded and installed the app on your computer, check the guide below to download and back up your Apple Music playlist for offline playback.
Main Features of AudFree Apple Music Converter

- Download Apple Music tracks, playlists, albums, etc.
- Convert Apple Music to MP3, WAV, AIFF, FLAC, etc.
- Conversion speeds of up to 17X with lossless quality kept
- Easy to customize music settings and format and support batch conversion
How to Download Apple Music for Back up Forever with AudFree Auditior
- Step 1Launch & Register AudFree Auditior
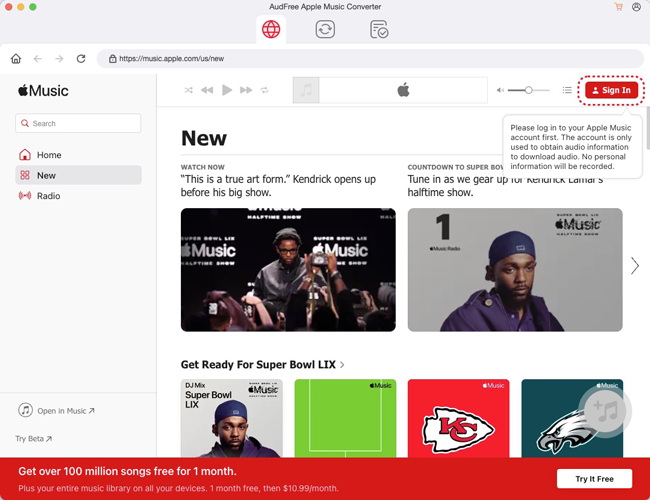
- First, download and install the AudFree Auditior app on your computer. Once the app is installed, hit the app icon to launch it. Next, go to the top menu bar and select the "Register" option. Now, enter the license key to activate the full software version if you have purchased it.
- Step 2Import Apple Music Songs to AudFree
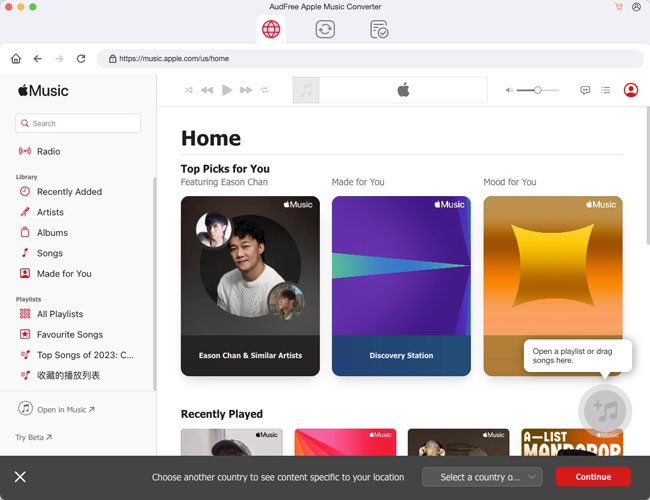
- Remember, you can use the built-in Apple Music web player in AudFree Auditior to import songs for converting. Just choose and click on the songs you like and tap the '+ ♫' icon. Later, press the 'Add to List' button.
- Step 3Customize Apple Music Output Format and Other Parameters
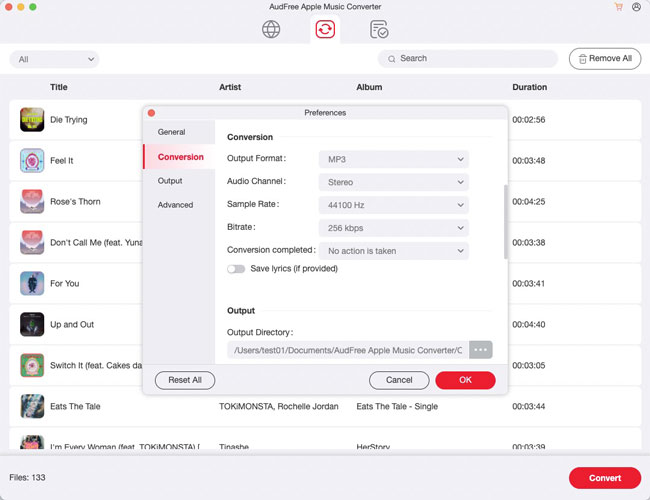
- Once the Apple Music songs are added, you can click on the "menu" > Preferences > Conversion option. Then you can choose your preferred audio format from the available options (MP3, M4A, AIFF, Lossless, WAV, FLAC, and M4B). You can also change the sample rate, bit rate, etc. of Apple Music tracks as you like.
- Step 4Convert and Back up Apple Music Forever
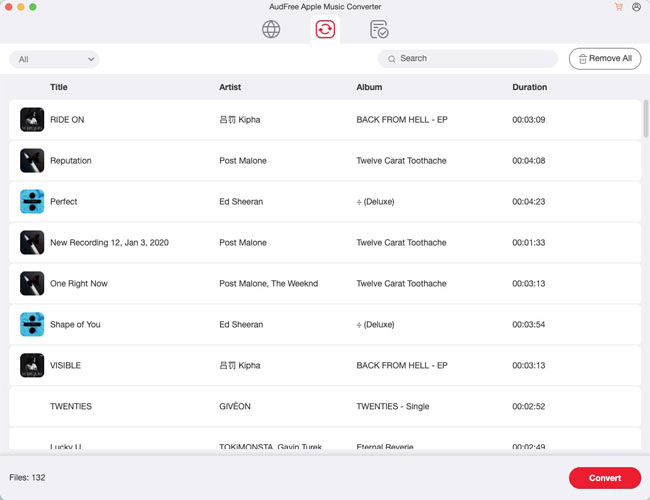
- After customizing your settings, click on the "Convert" button in the Converting window to start downloading and converting your Apple Music files. The conversion process will take some time, depending on the number of songs you are converting and the computer speed.
- Once complete, you can go to the "Converted" section to check all converted files and keep Apple Music on PC forever without the iCloud Music Library. From there, you can add them to your media player or any other device for offline playback.
Part 6. FAQs about iCloud Music Library
Q1: What Happens if I Turn off iCloud Music Library on iPhone/iPad/Mac?
A: Disabling the iCloud Music Library means you will not have access to your music library across all your devices anymore. This includes any songs that you have added to your library, as well as any playlists that you have created. Also, you can't access your Apple Music and you will lose the data as well as other media files that you have uploaded to your iCloud.
Q2: How to Turn on iCloud Music Library?
A: After you switch off iCloud Music Library, you can turn it on at once. Just go back to follow the steps in Part 2, Part 3, and Part 4. Then enable iCloud Music Library on your device.
Q3: How to Merge Your Music Library?
A: You can follow the guidance below to do that.
Replace: The songs and playlists from your device will be replaced with the songs and playlists from iCloud Music Library. Any songs or playlists on your device that are not in iCloud Music Library will be removed.
Keep: The songs and playlists from your device will remain on your device, and the songs and playlists from iCloud Music Library will be added to your device.
Merge: Both sets of songs and playlists will be combined. If there are any duplicate songs, they will be merged into a single song.
Q4: How to Turn on iCloud Syncing iTunes on iPhone?
A: There are three effective ways to turn on the iCloud syncing iTunes on iPhone:
Way 1. Open Settings on your iOS device and then go to Music. Tap the switch next to iCloud Music Library to turn it on. It might take some time to upload and sync your library if you have a lot of music.
Way 2. Launch the Music app on your iPhone/iPad/iPod Touch, and then tap the More button in the bottom-right corner of My Music screen. Choose Enabled Devices > Turn On iCloud Music Library from the pop-up menu.
Way 3. Connect your iOS device to a computer with iTunes installed, open iTunes, go to Summary > Options > check Sync with this iPhone over Wi-Fi.
Q5: What to Do When Getting "This account does not have iCloud Music Enabled" Issue?
A: When using Apple Music, some users may get this error. To solve it, you can follow the fixes below. These solutions are also available for solving iCloud Music Library keeps turning off.
Fix 1. Check whether the Apple System Status is normal or not.
Fix 2. Restart and update your iOS device or Mac computer.
Fix 3. Make sure that you have connected to a strong network connection.
Fix 4. Log out and log in to your Apple account.
Fix 5. Check if you have the latest versions of iOS and iTunes installed on your device.
Fix 6. Disable and enable Sync Library.
Part 7. In Conclusion
That's all to turn off iCloud Music Library on iPhone, iPad, iPod, Mac and PC devices. Since turning off your iCloud Music Library means you can't access your music from any other device, it's better to back up your music collection. Just draw support from AudFree Apple Music Converter. With this app, you can convert your Apple Music songs and keep them on your computer forever, even if you cancel your subscription. In this case, you can transfer Apple Music files to other devices and listen to Apple Music offline without any limits.

James Blair
Staff Editor


