There is nothing super frustrating than trying to play your favorite song in iTunes but you can't because it is greyed out. This is a common phenomenon on for iTunes songs. You will find that a favorite artist of yours has many songs on the platform but a number of the songs are greyed out and therefore cannot be played. The good news is that this being a common problem, the graying out of song also does have quite a number of easy fixes.

Part 1. Why Are Some Songs Greyed Out in iTunes
Before looking at how to fix greyed out songs on iTunes, it is important we look at why some songs are greyed out in iTunes. There are many reasons why iTunes songs get greyed out. The major cause of the graying of iTunes songs is the syncing problem. This occurs when your iPhone is not in sync with the iTunes. For example, if you delete some songs from your iTunes library and then sync your iTunes with your iPhone, some songs may still show up on your iPhone but will be greyed out because you have removed them from the iTunes library.
The other reason for songs in iTunes greyed out is the songs being in an unsupported format. This especially happens when you try to play the DRM protected songs on your computer. Some other common causes of the problem include missing files or corrupted files which may be as a result of many reasons, such as a virus attack on your device among others.
Part 2. How to Fix When iTunes Songs Greyed Out
Fixing greyed out iTunes songs is quite easy provided that you know what you need to do. There are many easy solutions you can apply to gray out songs so that you can enjoy your favorite songs at any time. Some of the most common solutions to this problem are:
- Video GuideHow to Fix Apple Music Songs Greyed Out
Method 1: Check Audio Format
In many cases, iTunes songs get greyed out because either they are protected by the DRM technology or they are encoded in a format that is not supported. If you see one of your favorite songs is greyed out, one of the first things you should do is logging into your iTunes account and checking the specific song if is protected by a DRM or not. You can do this by right-clicking on the track in iTunes and then selecting get info. When you check under the file you will see indicated "protected". This means that the song you are trying to listen to is protected by a DRM.
Armed with this information, it is now very easy to fix the problem. In this case, all you have to do is remove the DRM protection from the song and you are ready to go.
To fix greyed out songs in iTunes by way of braking the DRM protection, it requires you use a special third-party converter like AudFree DRM Audio Converter. This is a wonderful tool that will not only get rid of DRM lock from iTunes tracks but will also convert them to conventional formats such as FLAC, AIFF and MP3 so that you can play your favorite songs on any device for free.

To use this smart iTunes audio converter to fix the compatible issue of protected audio format, please follow these simple steps:
Step 1. Open AudFree DRM Audio Converter on your Mac or Windows. Then click files and tap '+ ♫' > 'Add to List' to import them to conversion window.
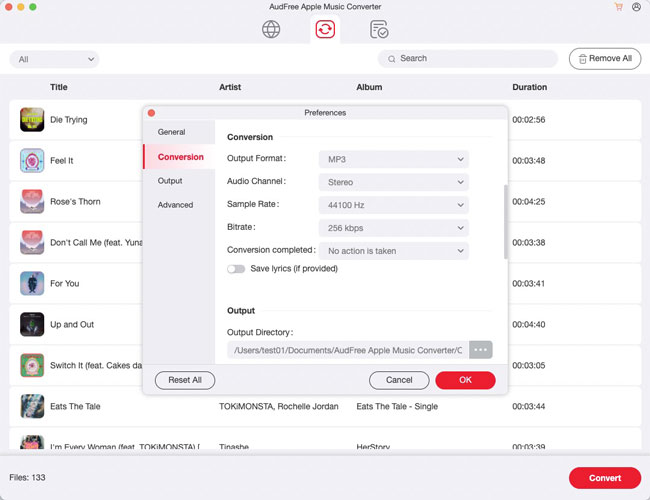
Step 2. Please click the 'menu' icon > Preferences > Conversion to set output format as MP3, FLAC, WAV, AIFF or others. Also, customize the output quality by changing bit rate, sample rate, etc.
Step 3. Just touch the 'Convert' button in the Converting window to start converting process. AudFree software will convert added iTunes music to target format files.
If you would like to get the detailed tutorial to convert iTunes songs to MP3, you can refer to this source page: How to Convert iTunes DRM M4P to MP3.
Method 2: Check iTunes Settings
Sometimes iTunes songs and especially those without a DRM protection get greyed out because of a problem with iTunes settings. It is therefore important to check the settings to see if anything related to the settings is responsible for the graying out of iTunes songs. To this, follow these steps:

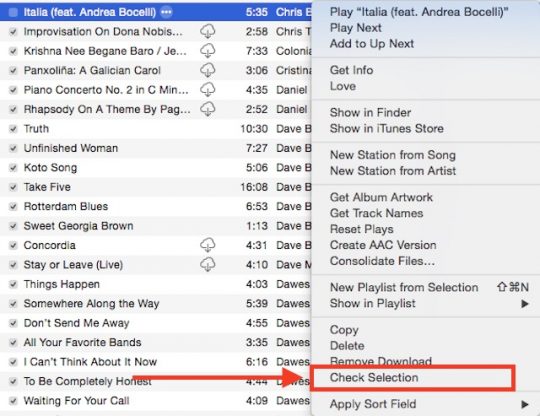
Step 1. Open your iTunes library and then right-click on any song that is greyed out.
Step 2. Navigate to the "Check Selection" option and click on it.
Step 3. Trying playing the song now, it should play normally.
Method 3: Re-authorize your Computer
If the solutions provided above do not work for the iTunes greyed out songs then the problem could be your computer. All you have to do in this case is to follow the steps provided below to re-authorize your computer:

Step 1. Navigate to your iTunes' menu bar and then click on the "Store" button.
Step 2. A drop-down menu will pop up. Select de-authorize this computer and then log out of your iTunes account.
Step 3. Restart your computer after sometimes. Open and log into your iTunes account. On the menu bar, click on the "Store" button and then "authorize this computer" option on the drop-down menu.
This will sort out the problem and your songs will no longer be greyed out.
Method 4: Re-download iTunes Songs
Sometimes songs you purchased from iTunes may become greyed out because of a missing file or if they become corrupted. The solution to this problem is to re-download the greyed out iTunes songs. To do these, follow these steps:

Step 1. Navigate the iTunes Store to the Menu bar.
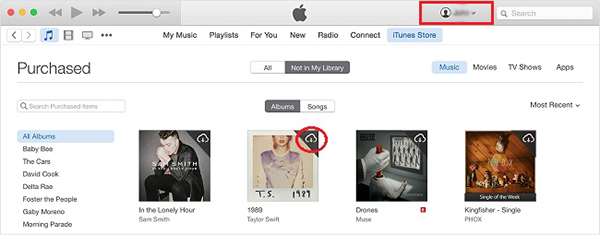
Step 2. Click and open your account and check for your purchases on the drop-down menu.
Step 3. Select the songs you purchased but are now greyed out and re-download them.
This should fix the problem as you download a new file. Get back to your app music and try playing the song. You should see that it is no longer greyed out.
Part 3. In Conclusion
It is not uncommon to find iTunes songs greyed out or sometimes iTunes songs greyed out with dotted circle. All these occur for a number of reasons that may include a DRM protection, incorrect iTunes settings, a missing file or even a corrupted file. To solve this problem there are lots of solutions that includes decrypting DRM technology using a third-party DRM converter such as AudFree DRM Audio Converter, checking and correcting iTunes settings, re-authorizing your computer or re-downloading the affected iTunes songs. This article has outlined all the process you need to follow for each of the listed steps.

James Blair
Staff Editor


