GarageBand is a powerful and versatile app for music creators and podcasters, offering features like audio recording, virtual instruments, and MIDI editing. Available on MacOS and iOS, it supports various audio formats, including WAV, AAC, MP3, etc, allowing users to create and make exclusive music and podcasts.
But what if you want to import Apple Music to GarageBand? While Apple Music files come with restrictions, you can still add them to your projects by following a few simple steps. This guide will show you how to add Apple Music songs to GarageBand on Mac, iPhone, or iPad quickly and easily.

Part 1. Can You Use Apple Music in GarageBand
No, you cannot directly import Apple Music to GarageBand unless you purchase single songs from iTunes Store.
This is because songs from Apple Music are DRM-protected, even if you download them. Apple Music tracks are encoded in M4P (protected AAC) format, which GarageBand does not support. If you try to import a song from Apple Music to GarageBand, the app will not recognize it due to these restrictions.
Tip: You can check the Apple Music audio format on the Music app by clicking File. If it indicates 'Apple Music Audio File' or 'Protected AAC', you can't import it to GarageBand directly.
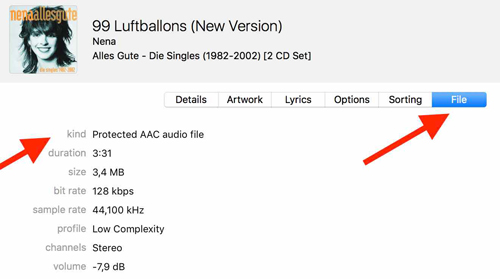
However, purchased Apple Music songs are stored in common AAC format, which GarageBand supports; so, you can add purchased songs to GarageBand without any issues. The cost per track ranges from $0.69 to $1.29. While this works, it can become expensive if you need to add multiple songs from Apple Music to Garageband.
Therefore, here is a more cost-effective method. You can convert Apple Music to MP3 and other formats with the professional Apple Music Downloader at Part 2. By doing this, you can import Apple Music songs to GarageBand without spending extra on purchases. Read on to learn how to get songs from Apple Music to GarageBand on Mac and iPhone/iPad!
| GarageBand Supported Formats | MP3, AAC, WAV, AIFF, CAF, Apple lossless |
| Apple Music Songs Format | Encrypted M4P (protected AAC) |
| AudFree Apple Music Converter Can Output | MP3, AIFF, Lossless, WAV, FLAC, M4A, M4B |
Part 2. How to Fix Apple Music Protected Songs Cannot Be Imported Garageband
If you encounter the Protected songs cannot be imported warning when import Apple Music to Garageband, don't worry, AudFree Apple Music Converter is here to help. This powerful software can remove Apple Music DRM protection. So you can download protected Apple Music content to MP3, AIFF, WAV, and other formats compatible with GarageBand.
AudFree Auditior also ensures lossless audio quality during conversion, preserving 100% of the original sound. Additionally, it retains ID3 tags like title, artist, album, and cover art, so your music files stay well-organized. By using this tool, you can quickly import songs from Apple Music to GarageBand. This allows you to create unique tracks, ringtones, or music projects without limitations. With the right approach, adding Apple Music to GarageBand becomes simple and efficient.
AudFree Apple Music Converter

- Remove DRM from Apple Music playlists, tracks, etc.
- Convert Apple Music M4P to WAV, FLAC, MP3, and other GarageBand supported formats
- Transfer iTunes, Apple Music to iMovie, GarageBand, Shortcut, etc.
- Preserve original audio quality and metadata info
How to Convert Apple Music as MP3 to GarageBand
AudFree Apple Music Converter is available for both Windows and macOS systems. You can use it on your computer securely. Here we will illustrate how to convert Apple Music songs on Mac. This way, you can fix the issue of Apple Music protected songs cannot be imported to GarageBand.
🔈 Note: To ensure a successful converting experience, please ensure that you have an active Apple Music account.
- Step 1Add DRM Apple Music files to AudFree Auditior
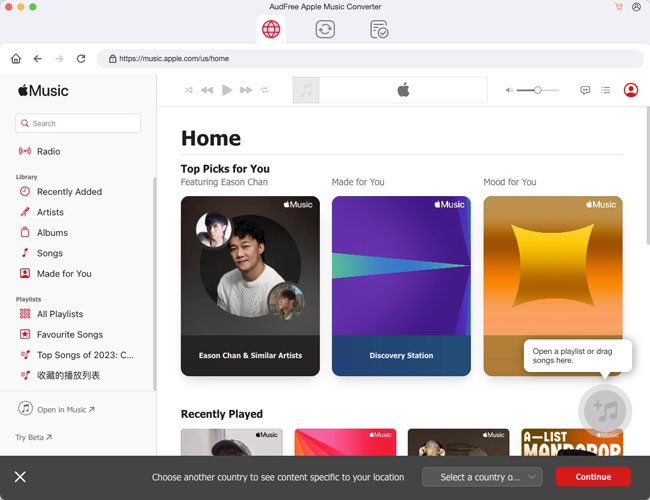
- Install and open AudFree Apple Music Converter. In the built-in Apple Music web player on the main interface of AudFree's software, please select Apple Music files and add them to AudFree Apple Music Converter.
- Step 2Set Apple Music output format as GarageBand enabled one
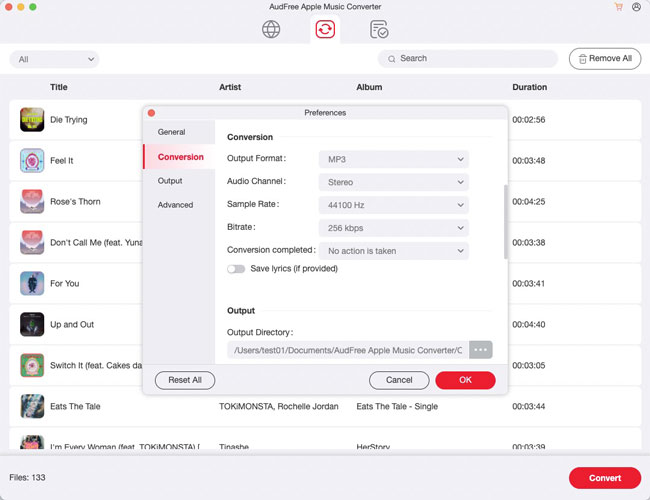
- Click the menu icon located in the top-right corner and choose Preferences to open the new window. There, tap Conversion and you can see seven output audio formats to choose from under the Output Format section. You can choose the output format as MP3, AIFF and WAV. Besides, it's able to personalize other audio parameters to enhance audio quality, including bit rate, sample rate, etc.
- Step 3Convert DRM Apple Music for GarageBand
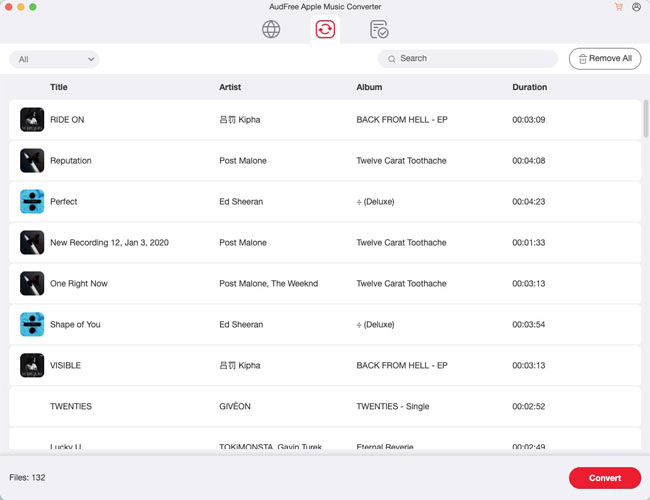
- After all settings are done, please just click the 'Convert' button from the Converting window to download and convert Apple Music files to plain audio files that you can add to GarageBand and other players. After conversion, please click the 'Converted' icon to locate converted Apple Music streams on your computer directly.
Part 3. How to Add a Song from Apple Music to GarageBand on Mac
Now all unprotected Apple Music songs are saved on your Mac computer. You can freely upload Apple Music to GarageBand. The following are the detailed steps on how to import Apple Music to GarageBand. You'll learn how to add converted Apple Music songs to GarageBand on Mac as well as the purchased iTunes songs in this part.
How to Import Apple Music to GarageBand on Mac [Converted Songs]
Step 1. Open GarageBand and select a project to work on.
Step 2. Right-click in the Tracks area menu bar, then choose New Audio Track from the dropdown menu.
Step 3. Move your cursor to the Tracks area, right-click again, and select Add Audio File. This will open your local folder. Locate the converted Apple Music files stored on your Mac.
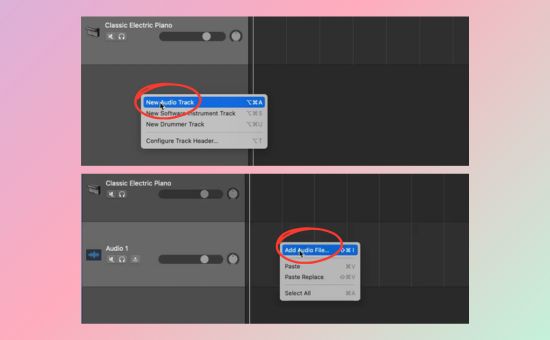
Tip: Alternatively, you can drag and drop your converted Apple Music files directly into the Tracks area in GarageBand.
How to Add iTunes Song to GarageBand on Mac [Purchased Songs]
If you've purchased music from iTunes Store, here's how to get Apple Music on GarageBand:
Step 1. Launch GarageBand and create a new project or open an existing one.
Step 2. Open the Apple Music app, then click on iTunes Store in the left sidebar. Navigate to Purchased, and re-download your purchased songs to your Mac if they aren't already saved locally.
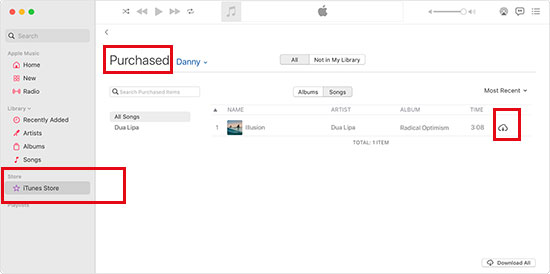
Step 3. Drag the downloaded song directly from your Apple Music library into the GarageBand Tracks area.
Part 4. How to Import Apple Music to GarageBand on iPhone
In this part, you'll learn how to add Apple Music songs to GarageBand on iPhone, both the converted songs and the purchased songs.
How to Add Apple Music to GarageBand on iPhone/iPad [Converted Songs]
To add converted Apple Music songs to GarageBand on your iPhone or iPad, follow these steps:
Step 1. To access Apple Music on iPhone or iPad, please make sure you have imported converted Apple Music to iTunes on your computer. If not, please open iTunes and go to the 'Menu' bar > 'Files' > 'Add to Library' to add them. Alternatively, you can transfer them from your computer to iPhone/iPad via AirDrop.
➤ Tips: Please turn on the 'iCloud Music Library' on your Mac and iOS devices.
View also: How to Turn Off iCloud Music Library
Step 2. Open GarageBand and choose a project to work on.
Step 3. Tap the Loop Browser icon (a loop symbol) in the top-right corner of the screen. Then, tap Files and locate the folder where your converted songs are stored. If you've uploaded the converted songs to Apple Music, switch to the Music tab to find them.
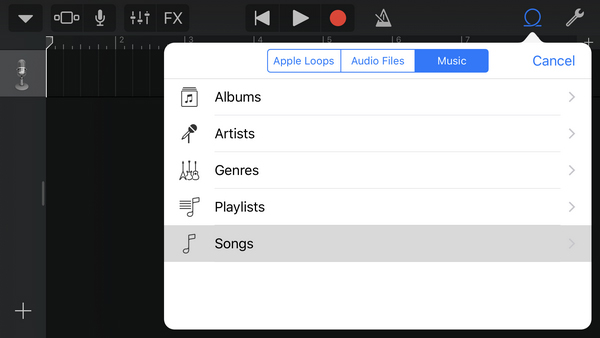
Step 4. Drag and drop the unprotected Apple Music songs into the Tracks area of GarageBand.
How to Import iTunes Song to GarageBand on iPhone/iPad [Purchased Songs]
Note: Before importing a purchased song, ensure it is downloaded locally from iCloud or the iTunes Store.
Step 1. Open GarageBand and select the project you'd like to edit.
Step 2. Tap the Loop Browser icon in the top-right corner.
Step 3. In the popup window, select Music. Use the search bar or refine your search by categories like Albums, Playlists, or Songs to locate your iTunes library.
Step 4. Drag your purchased iTunes song (in an unprotected format) from the library and drop it into the Tracks area.
Note: If your purchased iTunes songs are still in the protected M4P format, you'll need to convert them from M4P to MP3 or WAV before importing them into GarageBand.
Now, you can edit Apple Music in GarageBand and create your own music!
Part 5. Extension: How to Add A Song from GarageBand to Apple Music iPhone
Once you've finished your masterpiece in GarageBand, you can easily export GarageBand to Apple Music. Here's how:
Step 1. Open GarageBand and select the song you want to export.
Step 2. Click on the 'Share' button in the top right corner of the screen.
Step 3. From the dropdown menu, choose Song to Music (Mac) or Song to iTunes (older Mac versions). Enter your song's details, such as the title, artist name, and album name.
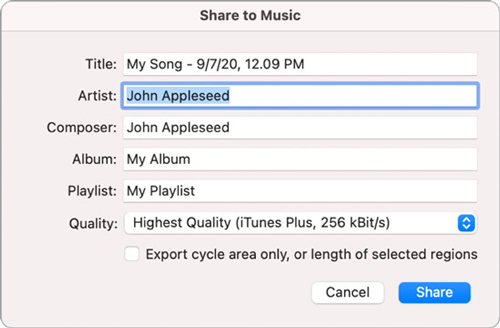
Step 4. Select the desired export format, and click Share.
Step 5. Open the Music app on your Mac or iPhone to find the exported song.
Tip: To sync your exported song across multiple devices, click the three-dot menu next to the song in the Music app and select Add to Library.
Part 6. More Tips on Apple Music to Garageband
#1. How to Edit Apple Music Songs on GarageBand
To edit a song on GarageBand, follow these steps:
Step 1. Open GarageBand and select the song you want to edit.
Step 2. Click on the 'Edit' button located in the top right corner of the screen.
Step 3. You will see a list of editing options such as trimming, splitting, and looping. Choose the option you want to use.
Step 4. Use the editing tool to make the changes you want to the song.
Step 5. Once you are satisfied with your edits, click on 'File' and then 'Save' to save your changes.
#2. How Do I Mix Songs From Apple Music to GarageBand
With GarageBand 10.0, you can operate in accordance with the following description. Please drag your Apple Music audio files from 'Media Browser' > 'Audio' on GarageBand. Then there are several mixing options.
1) Adjust the volume levels of each track to balance them and make them sound good together.
2) Use EQ and add other effects to adjust the tone of each track.
3) Panning tracks to the sides for special effects to place instruments from the stereo area.
4) Add transitions between songs to make the mix flow smoothly.
5) Use the automation curve of volume to create drama or tension for your projects or highlight songs at the track's particular points over time.
6) To mute or solo tracks to simplify and speed up your workflow.
Then you can export the final mix as an audio file.
#3. How to Make Ringtone from Apple Music in Garageband
It refers to how to use Apple Music songs in GarageBand. To make it, please look into the below step-by-step guide. Don't forget to transfer your converted or purchased Apple Music songs to GarageBand in advance.
Step 1. Add Apple Music songs to GarageBand on your iPhone according to the steps in Part 4. Then tap on the 'Loop Browser' again and choose 'Music' > 'Songs'.
Step 2. Then hold and drag the selected track into the timeline. You can use the handles to trim and edit your Apple Music ringtones.
Step 3. Next, tap on the inverted triangle icon from the upper left corner and click the pop-up 'My Songs' option. Your created songs will show on GarageBand's recent list.
Step 4. Long-press on 'My Song' and click on the 'Share' option from the pop-up list.
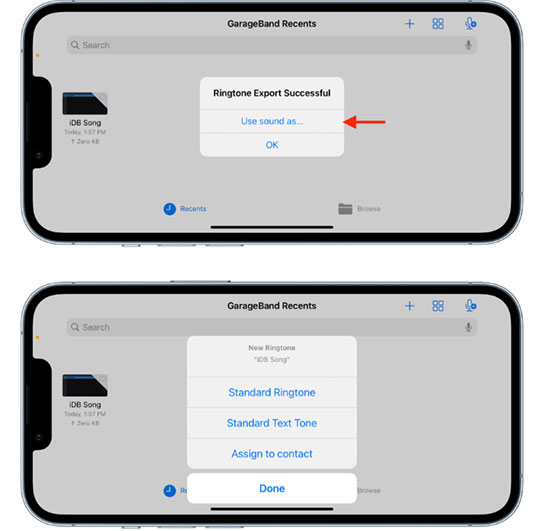
Step 5. Touch on 'Ringtone'. You can rename your ringtone and then tap on the top-right 'Export' button.
Step 6. Select 'Use sound as' > 'Standard Ringtone'. Now your Ringtone is set.
Part 7. The Verdict
Here are all methods to import Apple Music to GarageBand. Generally speaking, AudFree Apple Music Converter is the best shot to make it. Since it can convert Apple Music songs to various GarageBand-supported formats. Now, install it and enjoy your music listening experience with Apple Music on GarageBand.

James Blair
Staff Editor


