Windows Media Player is a versatile program for organizing and playing audio files on Windows PCs. On the other hand, Apple Music (or iTunes) stands out as one of the leading music streaming services, offering millions of songs. While it's easy to play Apple Music on Windows using iTunes, many users prefer to manage all their music in one centralized platform, such as Windows Media Player. So, how to transfer Apple Music to Windows Media Player?
This guide walks you through the process step by step, making your music library more versatile and accessible. Read on to import your entire iTunes library or playlists to WMP without hassle!
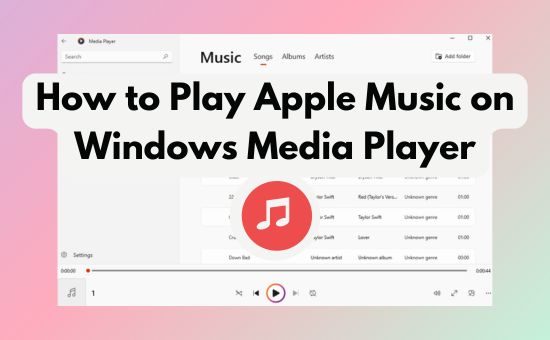
Part 1. Can You Transfer Music from iTunes to Windows Media Player
Apple Music files are protected by DRM (Digital Rights Management), which limits their usage outside the Apple Music or iTunes streaming service. Because of this, you cannot directly transfer Apple Music songs to Windows Media Player. However, by removing the DRM protection and converting the M4P files into MP3 and other widely compatible formats, you can import iTunes library to Windows Media Player without any issues.
Alternatively, you can buy music from the iTunes Store in unprotected AAC format. These files are the only iTunes codec for Windows Media Player that works seamlessly. However, purchasing your entire Apple Music or iTunes library, especially if it includes hundreds or thousands of songs, can become expensive.
For users who've already purchased some songs and want to add them to Windows Media Player, skip ahead to Part 3, where we show you how to transfer songs from iTunes to Windows Media Player easily.
Part 2. How to Download Apple Music/iTunes Songs to WMP
To add unpurchased Apple Music to Windows Media Player, you'll first need to remove DRM protection and convert Apple Music or iTunes files into a format compatible with Windows Media Player. For this, we recommend using the AudFree Apple Music Downloader, an efficient tool that converts Apple Music tracks to MP3, WAV, or FLAC formats.
With AudFree Auditior, you can enjoy 100% lossless quality and retain original ID3 tags, ensuring that your music library stays perfectly organized. Most importantly, once you’ve downloaded Apple Music tracks with this tool, the files will remain accessible forever, even after your Apple Music subscription expires.
AudFree Apple Music Converter

- Effortlessly convert Apple Music to MP3, WAV, AAC, etc. plain formats
- Download Apple Music/iTunes songs/podcasts at 30X speed
- Preserve the original quality and ID3 tags
- Save Apple Music playlists/albums in batch and save forever
Follow these simple steps to remove Apple Music/iTunes songs DRM protection for Apple Music Windows Media Player integration:
Step 1. Install AudFree Apple Music Downloader on Your Windows Computer
Start by downloading the AudFree Auditior software using the download button above. Once the download is complete, run the installer and follow the on-screen prompts to set it up on your Windows computer. The program requires minimal storage space and is quick to install.
After installation, launch AudFree Auditior. If you have iTunes installed on your PC, the software will automatically open iTunes for seamless integration. Otherwise, you may need to install iTunes from the official website first.
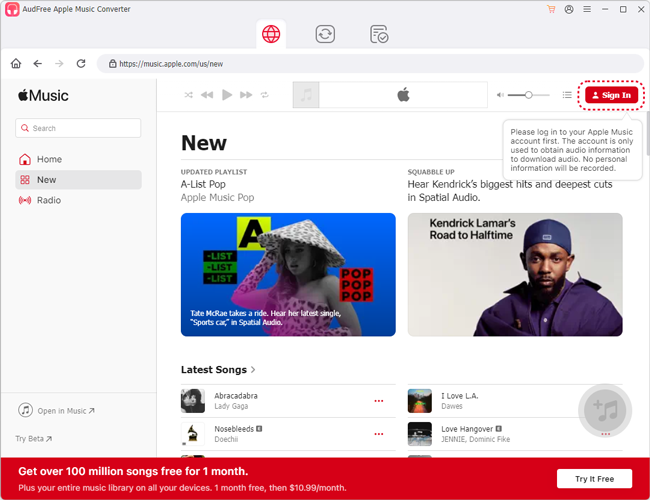
Step 2. Import Downloaded Apple Music/iTunes Songs to AudFree Auditior
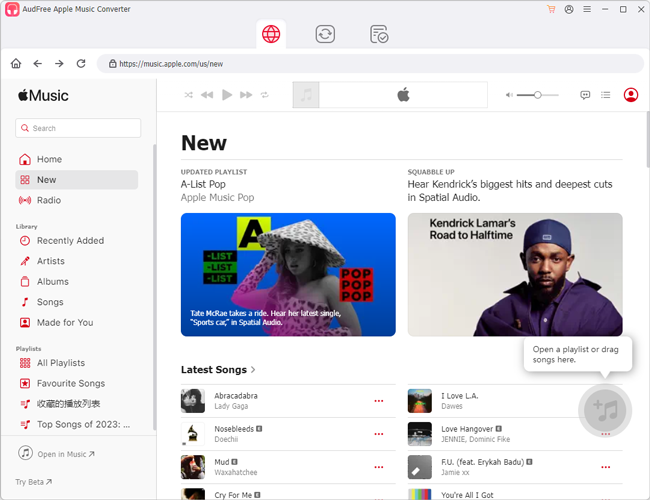
Before you begin converting, make sure you've downloaded your Apple Music or iTunes songs to your computer.
Next, open AudFree Auditior and click the first "+" button in the bottom-left corner of the interface. A new window will appear, allowing you to browse your iTunes library. Select the downloaded Apple Music tracks or albums you want to convert, then click "Add" to load them into AudFree Auditior.
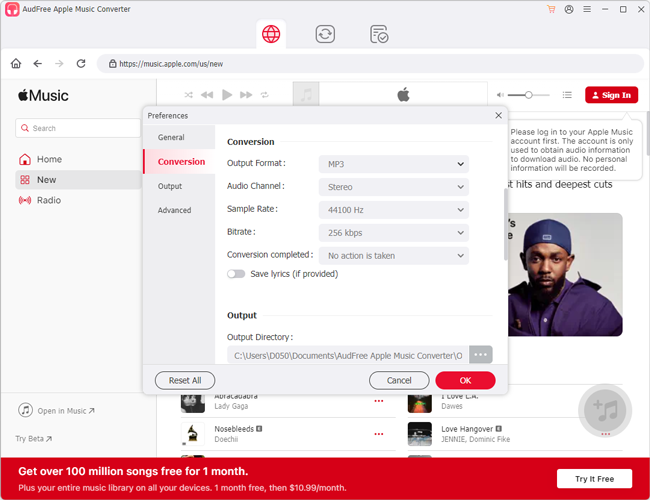
Step 3. Configure Apple Music Output Format for WMP
Click the Speaker icon (located in the bottom-right corner) to open the output Format Setting menu. From here, choose an output format supported by Windows Media Player, such as MP3 or WAV.
For advanced customization, you can adjust parameters like bit rate, sample rate, and audio channels to fine-tune the output quality based on your preferences.
View Also: How to Change Apple Music Bitrate
Step 4. Export iTunes Playlist to Windows Media Player
When all settings are configured, click the "Convert" button to start processing the files. AudFree Auditior will automatically convert the selected tracks into your chosen format at 30X speed.
Once the conversion is complete, the converted files will be saved in a designated folder on your computer. These files are now ready to be transferred to Windows Media Player. You can click the Converted list to find where are Apple Music downloads stored.
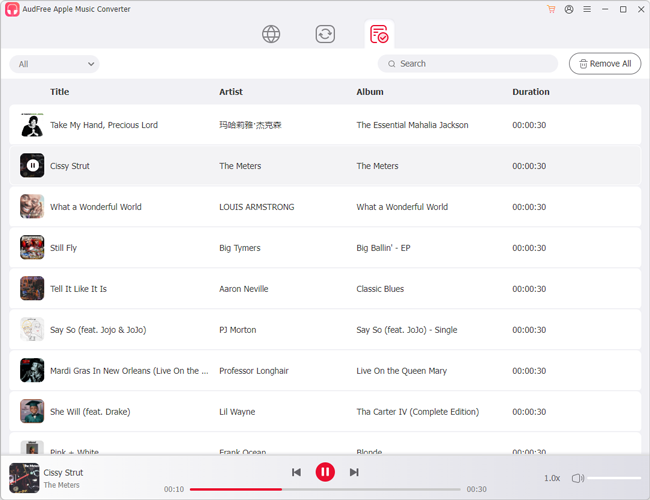
With the DRM-free Apple Music or iTunes songs saved on your computer, you can now proceed to the next step: importing your iTunes library to Windows Media Player. Keep reading for detailed instructions on how to complete this process effortlessly!
Part 3. How to Transfer Apple Music to Windows Media Player
Once you've converted Apple Music or iTunes songs into WAV, AAC, MP3, and other unprotected formats, you can easily transfer songs or playlists to Windows Media Player. The process differs slightly depending on whether you're using the old version or the latest version of Windows Media Player. Follow the appropriate guide below to manage your music library efficiently.
How to Transfer Songs from iTunes to Windows Media Player
If you're using the older version of Windows Media Player, follow these steps:
Step 1. Launch Windows Media Player on your computer.
Use the search bar at the bottom of your Windows taskbar and type Windows Media Player to open the application.
Step 2. Add Converted Apple Music Songs to the Library.
◼ Click Organize in the top-left menu bar;
◼ Select Manage Libraries > Music and then click Add to browse for the folder containing your converted Apple Music or iTunes songs;
◼ After locating the folder, click OK to confirm your selection.
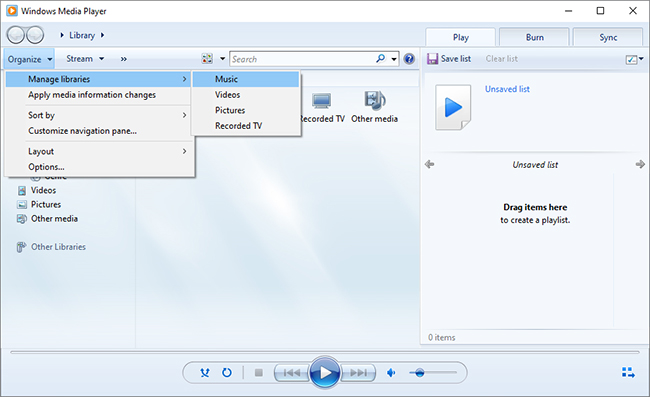
Step 3. Browse the Imported iTunes Songs on WMP
Once Windows Media Player verifies the imported songs, you'll be able to browse them under the Music section. You can organize them by Album, Artist, or Genre, etc. for easy access.
If you're using the latest version of Windows Media Player (now known simply as "Media Player" on modern Windows systems), follow these steps:
Step 1. Launch Media Player.
Open the new Media Player application on your Windows computer.
Step 2. Add Converted Songs to the Music Library.
◼ Click the Music library tab in the left-hand panel;
◼ Select Add Folder and browse for the folder containing your converted Apple Music or iTunes songs;
◼ Click Add this folder to Music to confirm and start adding your songs to the library.
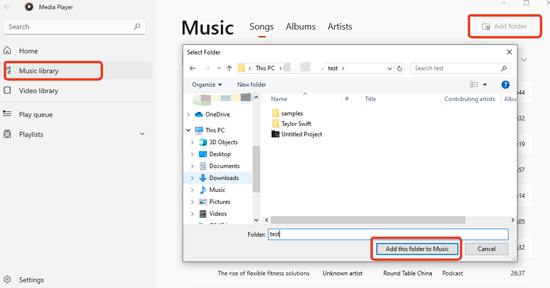
Step 3. Verify the Imported Songs.
Media Player will automatically index and verify the imported songs. Once completed, you'll find your Apple Music files in the Music section, organized by album, artist, or other metadata.
How to Import iTunes Playlist to Windows Media Player
While it's easy to import iTunes library to Windows Media Player, importing iTunes playlists to WMP directly can be more complicated.
On the old version of Windows Media Player, you can only go to the Playlist section, click Create Playlist, and drag and drop the imported songs into the newly created playlist.
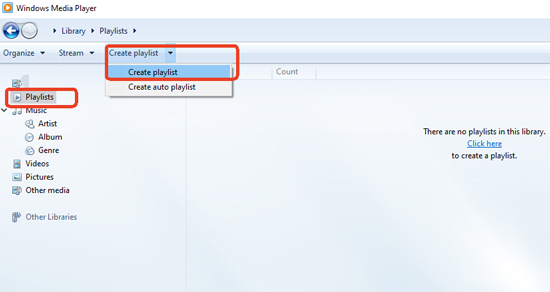
The latest version of Media Player makes it easier to handle playlists. Here's how to import iTunes playlist to Windows Media Player:
Step 1. Ensure that each Apple Music playlist is downloaded and saved in a separate folder during the conversion process.
Step 2. Open Media Player and click Play Queue on the left-hand panel.
Step 3. Click Add Files and choose Add Folder to Play Queue.
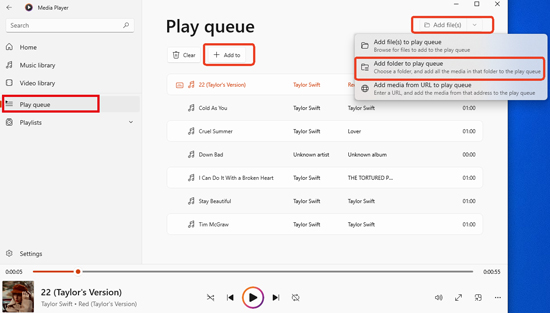
Step 4. Select the folder containing your converted playlist and click Add to > New Playlist to create a playlist in Media Player.
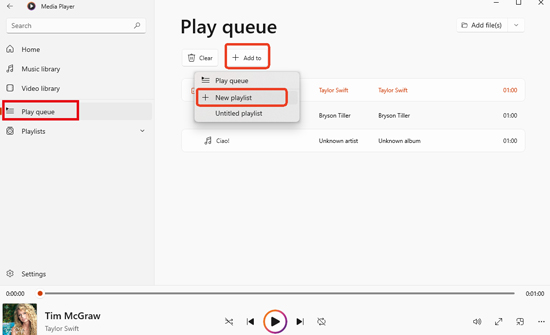
Step 5. Once you've created one playlist, click Clear under the Play Queue title to reset the queue, and then repeat the process for the next playlist folder.
This way, you can effortlessly organize your Apple Music playlists in the new version of Media Player.
By now, you should have the Apple Music Windows Media Player integrated successfully, whether you're using the old or new version. Enjoy seamless music playback and a well-organized music library!
Part 4. Conclusion
By following the steps outlined in this guide, you can seamlessly import iTunes to Windows Media Player when you have the right tools at your disposal. With AudFree Auditior, you can effortlessly remove DRM protection from Apple Music tracks and convert them into formats like MP3, WAV, or FLAC, fully compatible with Windows Media Player.
Don't let DRM limitations hold you back, try AudFree Auditior today and play iTunes in Windows Media Player without restrictions!

James Blair
Staff Editor


