Can you download Amazon Music to Adobe Premiere? You may find it very difficult, right? Due to the digital rights management, you are not allowed to transfer Amazon Music to other software even though you are a Premium user. But in this tutorial, we will share a method with you to download Amazon Music on your local folder and then import it to Adobe Premiere Pro and Elements. Also, you can get some tips in using added Amazon Music on Adobe Premiere.
Part 1. How to Download Amazon Music to Adobe Premiere - Needed Tool
As you know, users cannot import music to Adobe Premiere even though they are Amazon Music Prime or Unlimited users. But what if you are tired of the simple audio in Adobe Premiere Pro/Elements? How to solve this situation? That is to use a powerful software - AudFree Amazon Music Converter to download and save Amazon Music as your local audio files. Then, you can add them to your editor for free use.
What is the AudFree Amazon Music Converter?
To put it simply, it is a professional tool that can break the limitations of digital rights management. With it, you can download and convert Amazon Music to 6 common formats. They are MP3, FLAC, WAV, AAC, M4A as well as M4B. Besides, you are able to set the bit rate, sample rate, and channel for the Amazon Music audio. This function can create a new listening experience for your favorite music. Apart from these features, AudFree Amable works at a faster 5X speed to convert music and it keeps 100% lossless audio quality. Now, let's learn how to make it work for you.
AudFree Amazon Music Converter

- Convert Amazon Music to MP3, WAV, AAC, FLAC and more
- Save lossless audio quality and ID3 Tags of Amazon Music
- Convert Amazon Music at 5X speed
- Help add Amazon Music to Adobe Premiere Pro/Elements
🏷Note: It is 100% SECURE to use AudFree Amazon Music Converter for legal personal use.
How to Download Amazon Music to Adobe Premiere Pro/Elements
First, hit the big green 'Download' button above to install the tool and then double-click to run it.
- Step 1Personalize Output Parameters for Amazon Music
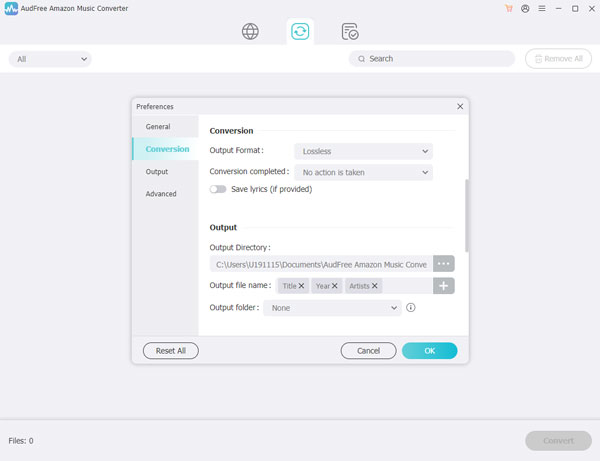
- View the top-right toolbar of AudFree Amazon Music Converter and select the 'Menu' icon. Then click 'Preferences' > 'Convert' to open a new window. Now, you can customize output parameters for your Amazon Music audio. You have to note that Adobe Premiere supports importing audio files in MP3, WAV, AAC, M4A, and more formats. So, you should reset a corresponding format for your Amazon Music songs via AudFree.
| Adobe Premiere Supported Audio Formats | AudFree Amable Supported Output Formats |
| MP3, AAC, M4A, WAV, WMA, AC3, AIFF, AIF, ASND and BWF | MP3, WAV, AAC, M4A, FLAC and M4B |
- Step 2Load Amazon Music to AudFree Amazon Music Converter
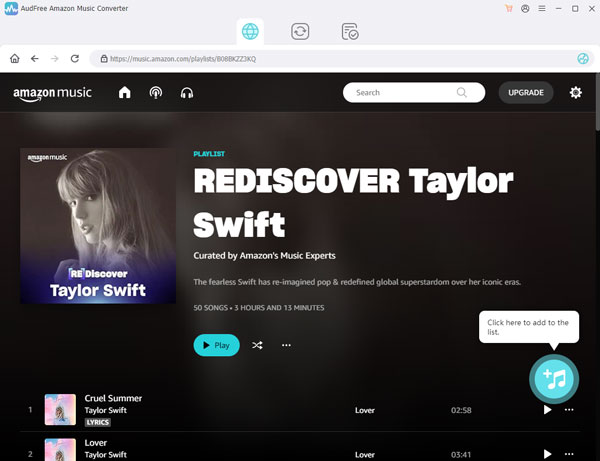
- From the Amazon Music desktop app, copy the URL links of Amazon Music songs and paste them into the converter. Next, click the '+' icon to load them. You also can simply drag & drop songs from Amazon Music to AudFree's main interface.
- Step 3Convert Amazon Music for Adobe Premiere Pro/Elements
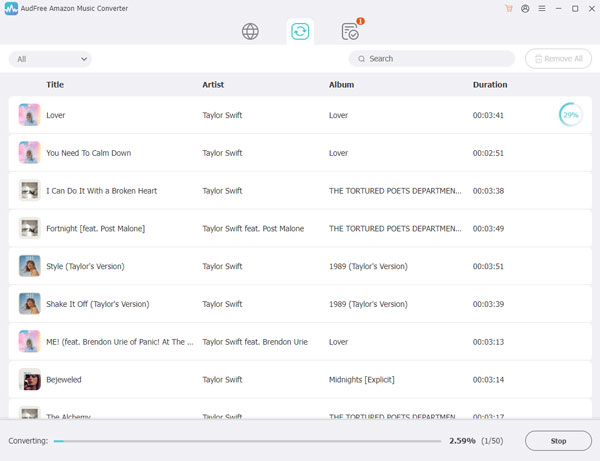
- Now, please select the big 'Convert' button in the bottom-right corner. You will see the tool is converting your songs. Then, locate the converted files in your computer's folder by hitting 'Convert' > 'Search'.
Part 2. How to Import Amazon Music into Adobe Premiere Pro/Elements
After you get converted audio files for Adobe Premiere from Amazon Music locally, you can import them into your Adobe Premiere Pro/Elements.
How to Import Amazon Music into Adobe Premiere Pro
Step 1. Launch your Adobe Premiere Pro and open your project.
Step 2. Then, please click 'Window > Workspaces > Audio' or 'Menu > Audio'.
Step 3. Now, select the 'Window > Media Browser' option to go to a new window. You should then hit 'Import' to find and add your Amazon Music downloads.
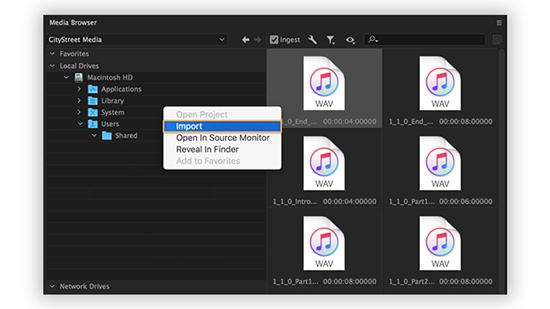
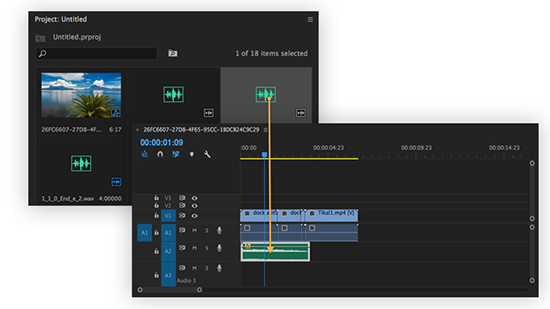
Step 4. Now, go to 'Window > Project'. Drag the imported music files from the 'Project' panel to the timeline in Premiere Pro. Then, you can use them in your video project.
How to Add Amazon Music to Adobe Premiere Elements
Step 1. Launch Adobe Premiere Elements to create a new project or open your existing video.
Step 2. Click 'Add Media' > 'Files and folders' on the top-left corner. You also can select 'File' > 'Add Media From' > 'Files and folders'.
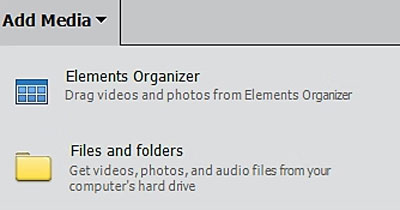
Step 3. To import Amazon Music into Adobe Premiere Elements, you should select the Amazon Music audio files and hit 'Open'.
Step 4. Now, you can use it as background music to create your video.
Part 3. How to Use Amazon Prime Music for Adobe Premiere Pro/Elements
After you import and add Amazon Prime Music files to Adobe Premiere Pro/Elements, you can edit your music with ease. Here you can see how to use Amazon Prime Music for Adobe Premiere Pro/Elements.
✂ Trim and Cut: Use the 'Razor' tool to cut the music track at specific points where you want to make edits. Position the playhead at the point where you want to make the cut and then click the music track to split it.
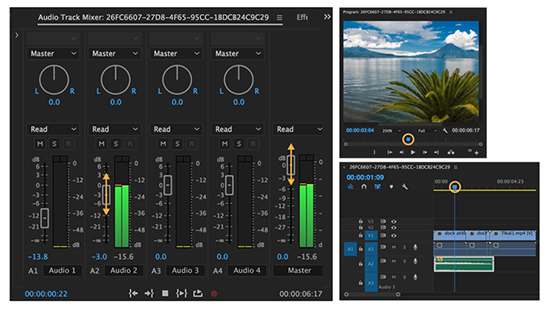
🔊 Adjust Volume: To adjust the volume of your Amazon Music tracks, please hit the audio track in the timeline and go to the 'Effect Controls' panel. Simply adjust the 'Volume' level to increase or decrease the audio volume.
💥 Apply Effects: You can apply various audio effects to the music track, such as EQ, reverb, or audio transitions. To do this, go to the 'Effects' panel. Then, search for the desired audio effect, and drag it onto the music track in the timeline.
🔖 Add Markers: Use markers (shortcut: M) to mark specific points in the music track, such as beats or important sections. This can help you synchronize the music with other elements in your video.
Part 4. Summary
Although you cannot sync Amazon Music to Adobe Premiere software directly. You can get help with the AudFree Amazon Music Converter. This advanced tool supports downloading Amazon Music on the local folder for importing into Adobe Premiere Pro/Elements. Additionally, you can play Amazon Music on multiple devices without using the Amazon Music app or Amazon Music web player.

Roger Kelly
Staff Editor


