One of the great features of music streaming services is Play Queue with which you can see and arrange what play next. Amazon Music, a popular music platform, undoubtedly offers this feature for its listeners. By using the play queue on Amazon Music, the playback position and the order of songs you arranged last time will be saved on your current Amazon Music-ready device.
You can have some control over your Amazon Music queue as long as you're an Amazon Music Unlimited, such as adding songs, arranging songs, and removing songs. Now, check the following passage to make use of your Amazon Music play queue.
📌 Note: Some functions in the queue may not be accessible for Amazon Music Prime. Because Amazon Music provides them with the on-demand mode in All-Access Playlists but the shuffle mode in any artist, album, or playlist.

Part 1. How to Access Play Queue on Amazon Music
Some newcomers to Amazon Music may ask "How do I find my queue on Amazon Music?" Indeed, it is simple to access and view the play queue on Amazon Music.
On Desktop
Step 1. Launch Amazon Music and pick any song to play.
Step 2. You will see the Amazon Music desktop app play queue button at the extreme bottom right of the Now Playing bar.
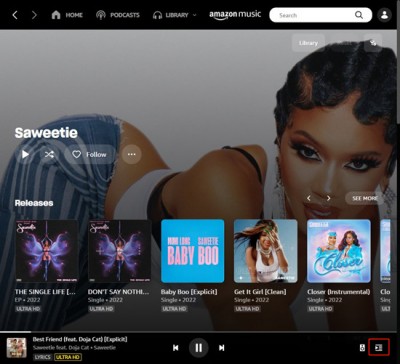
Step 3. Hit on the button and you can access all songs in the play queue.
On Mobile
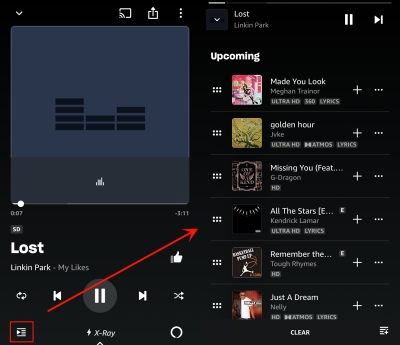
Step 1. Tap the song that is playing at the bottom of the Amazon Music app, and it will enter into the full-screen view.
Step 2. From here, select the play queue button at the bottom left corner and you will know which song is upcoming.
Part 2. How to Add Songs to Amazon Music Queue
Once you access the play queue on Amazon Music, you can fill your queue with your favorite songs. Now, read on to find out how Amazon Music songs add to the queue.
On Desktop
Step 1. On Amazon Music, find the track or album you'd like to play next.
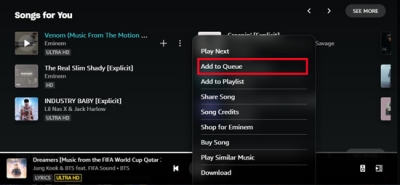
Step 2. Right-click the song or click the 'three vertical dots' icon next to the song.
Step 3. Select 'Add to Queue' from the drop-down menu.
On Mobile
Step 1. Fire up the Amazon Music app on your mobile phone.
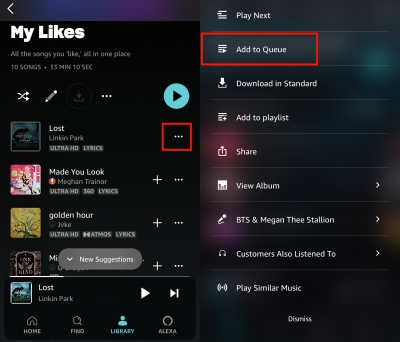
Step 2. Tap the three dots next to the song or the playlist you want to add to the play queue.
Step 3. From the list, choose 'Add to Queue'. And the content will display in your queue.
Part 3. How to Change the Order of Songs in Queue
If you're not satisfied with the order of songs in the Amazon Music queue, you are allowed to arrange songs in your wanted order.
Step 1. Whether you're using the Amazon Music app on mobile or desktop, open the play queue by using the tutorial in Part 1 and you can see songs display in a certain order.
Step 2. Drag and drop the song to your wanted position.
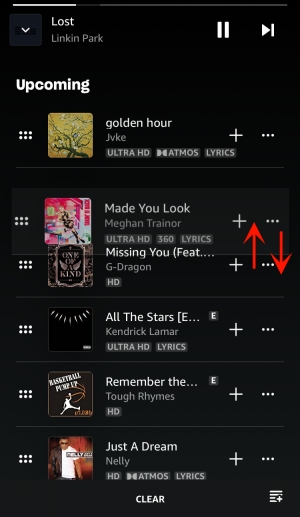
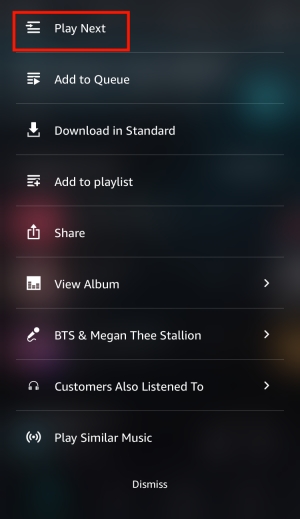
Step 3. Also, if you want a song to be played next, just hit on the 'More' icon and select 'Play Next'.
Part 4. How to Remove Songs from Amazon Music Queue
After adding a lot of mixes to the play queue, you have the freedom to remove them whenever you don't wish to listen to them. Meanwhile, Amazon Music allows you to clear certain songs in the queue with a few clicks or clear the entire queue with one click.
To Remove a Song from the Queue On Desktop:
Step 1. Open the Amazon Music play queue.
Step 2. Find the song you don't want to listen to next time. Once you right-click it, the 'Remove from queue' option is available.
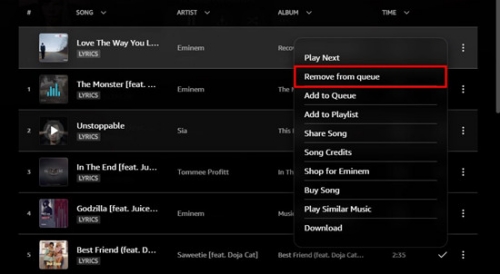
Step 3. If you opt to delete a host of songs, please press and hold on to the Ctrl or Shift to select several contents. After selecting, repeat Step 2 above and the selection of songs will be removed immediately.
To Remove a Song from the Queue On Mobile:
Step 1. Go to the play queue view to locate the song you'd like to remove.
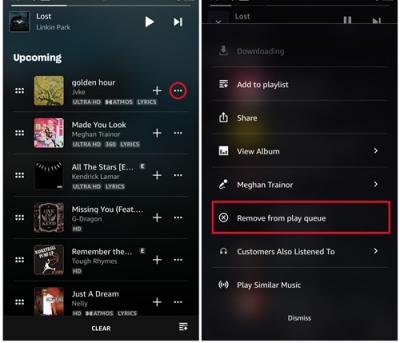
Step 2. Tap on the 'three dots' button next to the song.
Step 3. Select 'Remove from play queue' to finish the process.
To Clear Queue on Amazon Music for Desktop:
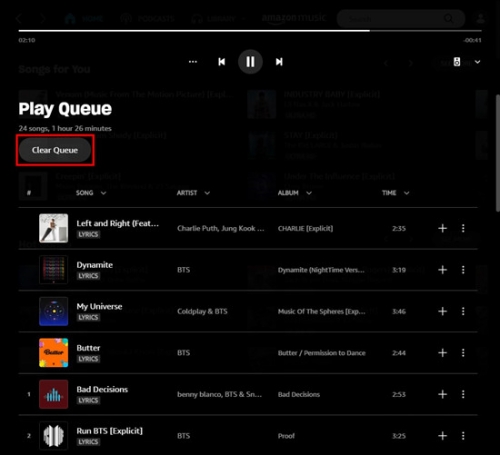
Step 1. After opening the queue window, you can see 'Clear Queue' under 'Play Queue'.
Step 2. Hit on 'Clear Queue' and the queue together with all tracks will be cleared. And the now playing song will be stopped too.
See Also: How to Clear Amazon Music Cache
To Clear Queue on Amazon Music for Mobile:
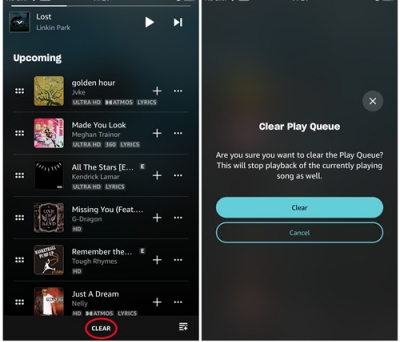
Step 1. Once open the play queue view, the 'CLEAR' option will be shown at the bottom.
Step 2. Tap it and a new notification will pop up.
Step 3. Just select 'Clear' to confirm your decision.
Part 5. How to Download the Amazon Music Queue
After you customize your play queue to the most ideal, now, you can transfer the queue to a playlist for downloading. As we all know, offline listening is only accessible in All-Access Playlists for Amazon Music Prime. But by using the following method, you can also download the playlist including the play queue even if you're a Free or Prime listener.
AudFree Amazon Music Converter is an Amazon Music downloader aiming to download and convert songs from Amazon Music to MP3, AAC, WAV, FLAC, M4A, and M4B. It is designed for all Amazon Music users. With this great tool, you are capable of getting an unlimited number of songs from Amazon Music without download limits. Moreover, it works automatically at a 5x speed and preserves the lossless sound quality including HD/Ultra HD from Amazon Music.
AudFree Amazon Music Converter
How to Download Amazon Prime/Unlimited Music to Any MP3 Player
Click the above download button to install this safe-to-use onverter on your PC or Mac. Then refer to the below user guide and view how to convert Amazon Music to MP3 and other files.
- Step 1Export the Play Queue to the Playlist
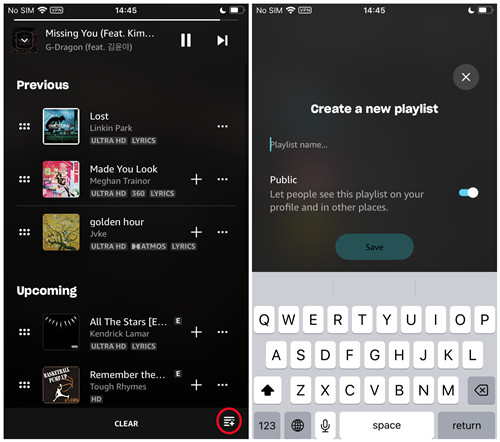
- To download the Amazon Music queue, first, you're required to save the queue as a new playlist on your mobile phone. Locate and tap the Add button at the bottom right corner of the queue view. Enter a name for the playlist and turn on the 'Public' option. Next, tap 'Save' and then you can go to Library > Playlist to listen to it. For Amazon Music Unlimited, simply tap the 'More Options' menu, and tap 'Download' to download the playlist.
- Step 2Customize Audio Parameters for Amazon Music Playlist
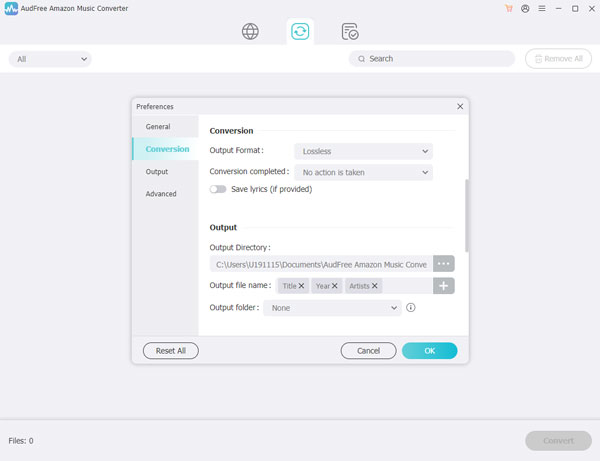
- After importing, you are free to customize parameters as you like. Just click the top-right Menu button like three horizontal lines, and select the first option 'Preferences' from the dropdown menu. Then switch to the 'Convert' section where you're able to set the audio format, sample rate, bit rate, channel, etc. If you're not satisfied with the output location, you can also change the output path by clicking the three dots on the bottom.
- Step 3Add Play Queue Playlist to AudFree Amable
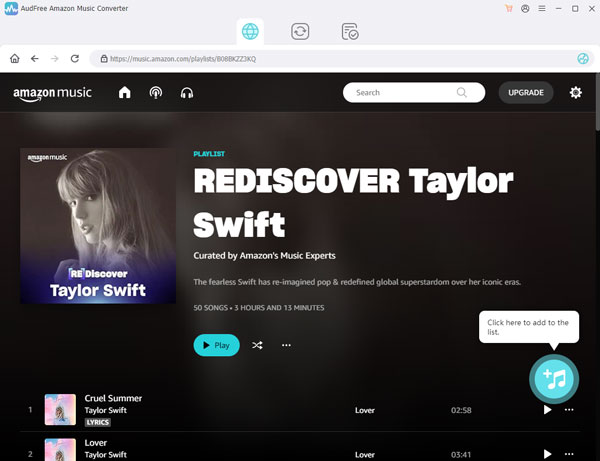
- You can install AudFree Amable Music Converter to access offline listening without restrictions. Just launch the AudFree program, and copy the link of the playlist from Amazon Music to AudFree's search bar. Next, hit on the right '+' button after the search bar. Also, you can just drag and drop this playlist to AudFree Amable.
- Step 4Start Downloading Amazon Music Play Queue Playlist
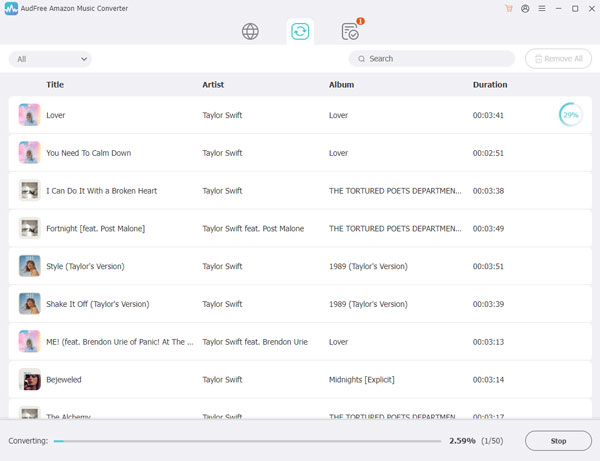
- Now view the list carefully and check off the songs that were in the play queue before. After selecting, one-click the 'Convert' option and this top Amazon Music downloader will convert the added playlists automatically. Once done, the program enables you to browse all the downloaded songs on the History list by clicking the 'Converted' button. You can also apply the search icon beside each song to exactly find them in the local folder.
In Conclusion
After finishing reading, you may have known how to add, remove, and arrange songs on the Amazon Music play queue. Now, dive into your favorite music with this feature! In case you might want to download the play queue for listening to Amazon Music offline, Part 5 provides feasible ways for all of you. Amazon Music Unlimited can directly download the play queue on Amazon Music, while Free and Prime users can try our recommended AudFree Amazon Music Converter to achieve that too.

Roger Kelly
Staff Editor


